
Introduction
When a table grows too large to fit on a single slide, keeping a consistent format while splitting the content manually is tedious and error-prone. The presentaid Format and Split Table tool automates this: it applies a uniform format to your table and, if the content exceeds the defined maximum height, automatically creates additional tables on new slides. It can also split a table into multiple side-by-side columns on the same slide.
How to Open the Dialog
- Right-click the table you want to format and split
- In the context menu, hover over presentaid Table Style
- Click Format and Split table
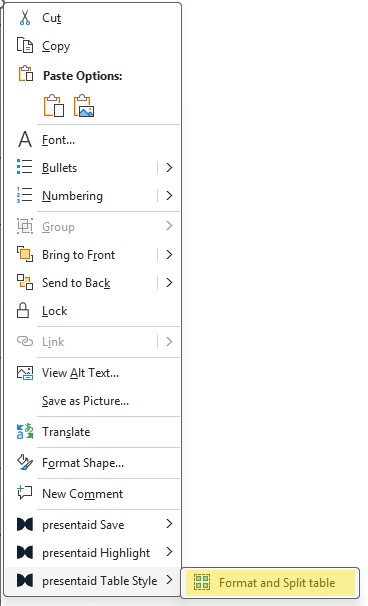
Split Table Context Menu
The Format and Split Table dialog will open.
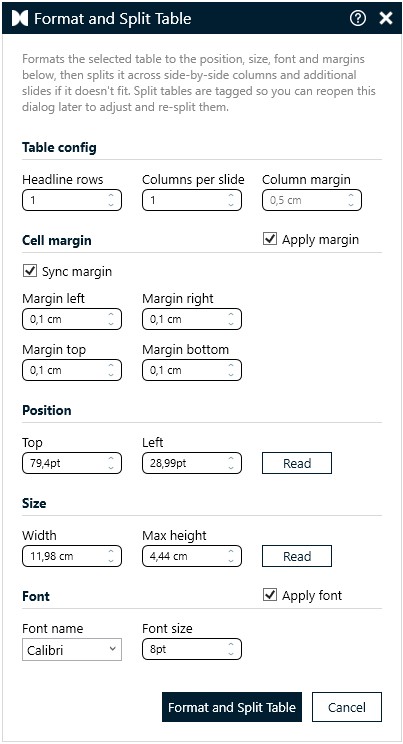
Table Config
Define the overall structure of the split output:
- Headline rows: The number of rows at the top of the table that act as headers. These rows are repeated on every new table created by the split and are not counted when calculating the maximum height.
- Columns per slide: How many side-by-side table columns should be placed on the same slide.
- Column margin: The horizontal space between side-by-side columns on the same slide.
Cell Margin
Control the internal padding of every cell in the table:
- Enable Apply margin to apply the cell margin settings during formatting.
- Enable Sync margin to keep all four sides equal - changing one value updates the others automatically.
- Set Margin left, Margin right, Margin top, and Margin bottom individually when sync is off.
Position
Define where the table should be placed on the slide:
- Top: Distance from the top edge of the slide.
- Left: Distance from the left edge of the slide.
Click Read to automatically populate the position values from a shape currently selected on the slide - useful for precisely matching an existing layout.
Size
Control the dimensions of the output table:
- Width: The target width of the table. The current table will be resized to this value.
- Max height: The maximum height the table may reach on a slide. If the content exceeds this height, the overflow rows are placed into a new table on the next slide.
Click Read to read the width and height from a selected shape on the slide.
Font
Apply a consistent font to all cells in the table:
- Enable Apply font to apply the font settings during formatting.
- Font name: The typeface to apply (e.g. Calibri).
- Font size: The font size to apply to all cell content.
Running the Split
Click Format and Split Table to apply all settings and execute the split. Click Cancel to close the dialog without making any changes.